When Your Firewall Is Too Helpful: Proxy ARP, DHCP, and the VMs That Wouldn’t Connect
My existing VMs could reach the network. A brand-new Windows VM could not. Same lab. Same subnet. A very different evening than I had planned.
In my previous post, I worked through forcing VM traffic out of Proxmox, across the Debian tap, and through OPNsense. This time, I had to work out why that arrangement was refusing to let a new guest settle into the network.
The guest isolation script was an obvious suspect. Then the tap started logging DHCP drops. Eventually, a packet capture showed OPNsense answering for an address at exactly the wrong moment.
The firewall was enthusiastic. The new VM was considerably less impressed.
The Network Is Still Deliberately Weird
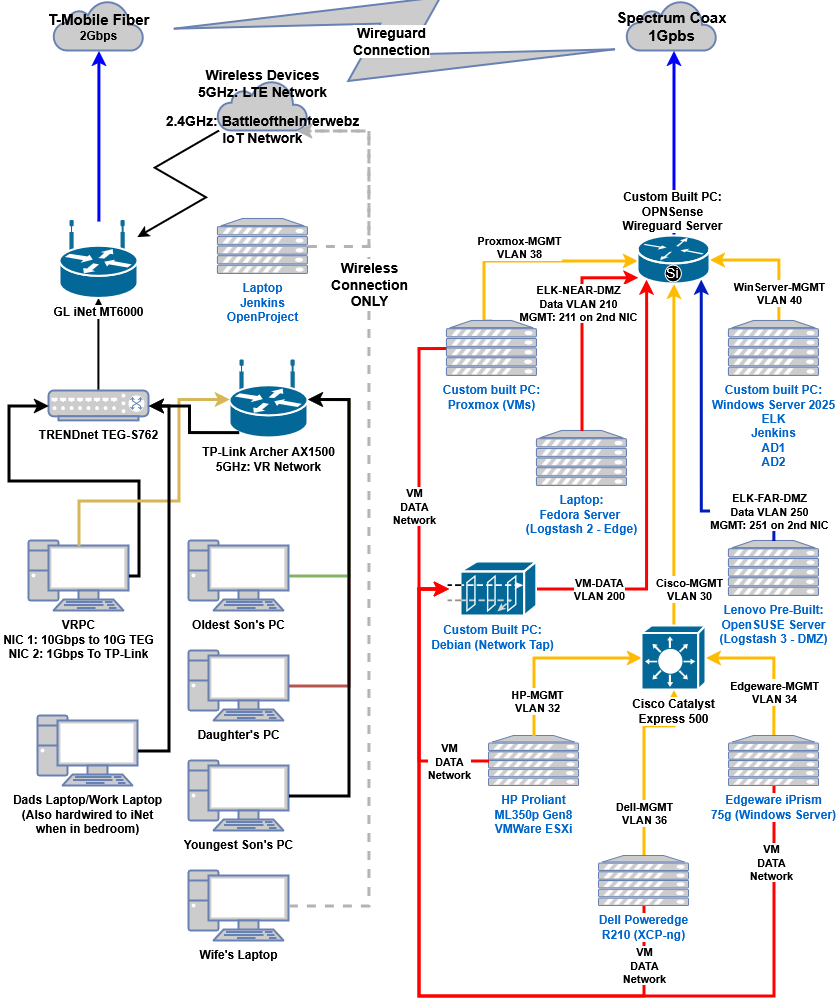
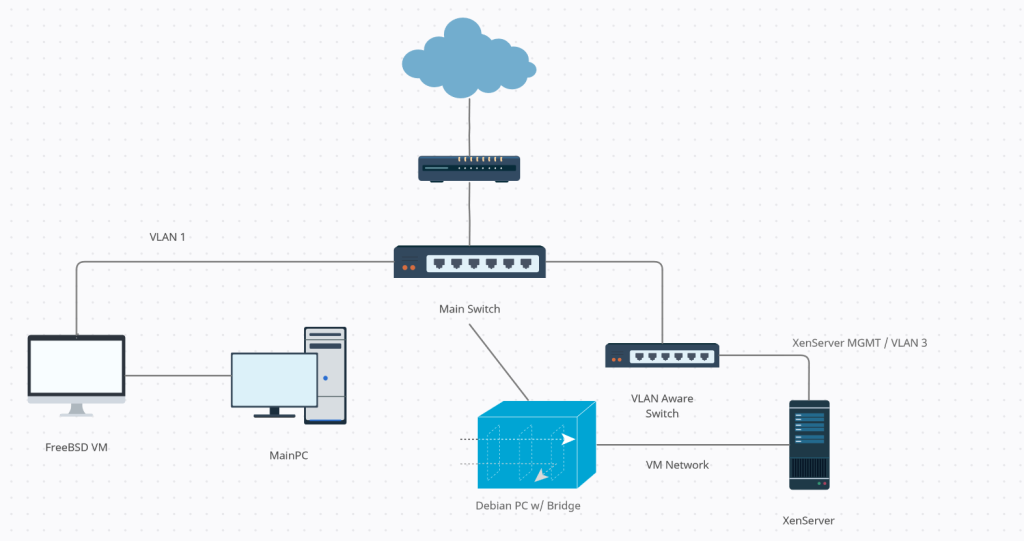
VMData uses 172.20.200.0/24, with OPNsense at 172.20.200.1. The Proxmox uplink is enp7s0. Traffic crosses an inline Debian bridge named br0, using enp42s0 on the guest side and enp36s0 toward OPNsense. The corresponding OPNsense interface is VMDataWARNING, internally opt8, on igb0.
Proxmox VMData guests
        |
      enp7s0
        |
network-tap: enp42s0 -- br0 -- enp36s0
        |
OPNsense: igb0 / VMDataWARNING
          172.20.200.1/24
The goal is to prevent guests from communicating directly across the Proxmox bridge, while allowing approved traffic through OPNsense. That includes approved peers inside the same /24. A guest normally ARPs directly for a peer in its own subnet; Proxy ARP lets the firewall supply its own MAC address for that peer so the guest sends the packet to the firewall instead.
The existing guest guard drops bridge forwarding when both ports are guest-side ports and neither is the uplink. Its intended uplink path remains available. The investigation therefore needed to follow the actual packets across the tap and firewall before blaming that rule.
For context, the lab was reported as Proxmox 9.2.3. The router identified itself as OPNsense 26.1.8_5 on amd64, and its installed responder package was choparp-20150613_1. This was a configuration interaction observed in this lab; it is not a claim that every OPNsense Proxy ARP configuration breaks DHCP.
The Tap Looked Guilty
The tap repeatedly logged packets like this:
FINAL-IN-DROP: IN=br0 OUT= PHYSIN=enp42s0
SRC=0.0.0.0 DST=255.255.255.255
PROTO=UDP SPT=68 DPT=67
That is exactly the sort of traffic a client can send before it has an IPv4 address. It looked like the tap was preventing DHCP from reaching the router. The important clue was the chain: this was an INPUT log on a bridge, while transit traffic also needed to be checked in FORWARD.
The live counters showed 44 packets accepted by the DHCP broadcast forwarding rule. The final INPUT drop counter showed the same packet count and byte total. The DHCP server reply forwarding rule also had accepted packets. Those counters suggested that the logged drops concerned the bridge host’s local delivery of the broadcast, rather than proving the bridged traffic had been stopped.
The bridge filtering documentation describes the distinction between local input and forwarding through the bridge.
The stronger evidence came from OPNsense itself: its capture showed the client requests arriving and DHCP replies leaving. Whatever the tap’s local INPUT log said, those exchanges had crossed the tap. Broadly opening its firewall would have been a poor response to evidence that the required transit path already worked.
A Detour Through the Firewall Rules
There were two separate rule questions along the way. First, my manual DHCP rule used the VMData subnet as its source and 172.20.200.1 as its destination. That does not describe the initial packet 0.0.0.0:68 → 255.255.255.255:67. Expanding the automatically generated rules showed the broadcast DHCP allowance, the client-to-firewall allowance, and the firewall’s server replies.
The capture then confirmed an actual exchange.
Second, a Logstash connection from the tap at 172.20.200.100 to 192.168.250.2:10250 was hitting BLOCK ALL OTHER RFC1918 on VMDataWARNING. The rule screenshot being compared against it was on the Logstash2 interface and allowed a different source. That rule did not establish an allowance for this incoming VMData flow.
For that connection, the relevant checks were the incoming interface, the actual contents of the source and destination aliases, and the position of the matching pass rule ahead of the private-network block. OPNsense documents incoming filtering and default quick-rule ordering in its firewall rules guide.
We did not establish a final resolution for that separate Logstash rule issue in this session.
I also checked the tap’s gateway-to-subnet ICMP allowance. In the live rules, that forwarding exception was ahead of the broader gateway drops and had accepted packets. It was useful for diagnostics, but it did not explain why a DHCP address would be offered and then abandoned.
The next capture did.
OPNsense Was Claiming the New Guest’s Address
The decisive sequence was captured on OPNsense. DHCP replies offered the guest 172.20.200.169. The guest then checked whether that address was already in use:
23:32:04.528775 IP 172.20.200.1.67 > 172.20.200.169.68:
    BOOTP/DHCP, Reply
23:32:04.622769 ARP, Request who-has 172.20.200.169 tell 0.0.0.0
23:32:04.667467 ARP, Reply 172.20.200.169 is-at 98:b7:85:20:d1:d4
That reply MAC was the OPNsense interface’s MAC. The router was claiming the address the guest was attempting to acquire.
New VM:   Is anyone already using 172.20.200.169?
OPNsense: Yes. Send it to my MAC.
New VM:   Then I cannot use it.
An ARP probe uses a sender IP of 0.0.0.0 and asks about a candidate address. A reply claiming that candidate is evidence of a conflict from the probing host’s perspective. An ARP announcement has a different purpose and uses the same sender and target IP.
These behaviors are defined in RFC 5227, IPv4 Address Conflict Detection.
My Virtual IP entry covered the entire 172.20.200.0/24 as Proxy ARP. It was answering for the candidate address during that probe. Later in the failure capture, the guest began probing a 169.254.x.x link-local address. The short BOOTP summaries did not decode a DHCP DECLINE, so I am not treating a DECLINE as something we captured.
The ARP reply, repeated acquisition attempts, and behavior after removing Proxy ARP were the useful evidence.
Disabling the broad Proxy ARP entry and disabling/re-enabling the guest’s adapter made connectivity work. That intervention confirmed the suspected interaction. The earlier “existing VMs work, new VMs fail” symptom now made sense: a guest trying to acquire and validate an address was exercising a different path from a guest already using an established address.
Teaching Proxy ARP When to Stay Quiet
Leaving Proxy ARP disabled would have removed the false conflict, but it also removed the responder needed for permitted peers in the isolated subnet. The requirement was access to any allowed peer, with OPNsense still enforcing the policy. Disabling Windows address conflict detection would have hidden the symptom at the guest and would not have corrected the responder.
OPNsense’s Virtual IP documentation identifies choparp as the Proxy ARP responder. We reviewed the 20150613 upstream source. Its capture filter selects matching ARP requests, and its callback builds and injects a reply without distinguishing these probes from ordinary peer resolution.
The replacement, choparp-vmdata, retains normal proxy replies and adds a few explicit exclusions:
- Ignore requests whose sender IP is
0.0.0.0, including DHCP address probes. - Ignore announcements whose sender and target IP addresses are equal.
- Ignore requests sent by the router itself, checking both the Ethernet source and ARP sender MAC. The router must learn the real guest MAC when it resolves a guest.
- Reject malformed, truncated, oversized, non-ARP, and non-request captures before constructing a reply.
The callback also builds the reply in its own buffer rather than modifying libpcap’s supplied capture buffer. A separate pointer check was corrected to test for NULL. The change was kept in a distinct binary; the packaged responder was not overwritten.
The foreground candidate was limited to this interface and subnet, excluding the network address, gateway, and broadcast address:
./build.5NCZtB/choparp-vmdata igb0 auto \
  '172.20.200.0/24' '-172.20.200.0/32' \
  '-172.20.200.1/32' '-172.20.200.255/32'
The original stock Proxy ARP VIP had to remain removed so that two responders would not compete. The normal 172.20.200.1/24 interface address remained configured.
Fourteen Tests, Then Actual Traffic
The build ran natively on the router and passed all 14 offline checks. Those covered suppression of probes, announcements, and router-originated requests; correct ordinary peer replies; defensive packet rejection; and the capture filter’s target and exclusion behavior. The only compiler warning was an unused signal parameter in the existing cleanup function.
Then the live capture showed a complete DHCP Discover, Offer, Request, and ACK sequence for 172.20.200.185. The ACK supplied a /24 mask and the expected gateway and DNS server. Three probes for that address followed without the earlier false proxy claim, and the guest subsequently announced the address.
Peer resolution also worked in both directions between the guest at .185 and the Logstash host at .200. For ordinary peer requests, the replacement answered with the firewall’s MAC as intended.
The most useful validation was the real TCP connection. A six-byte payload from 172.20.200.200:30200 reached 172.20.200.185:54185, and the guest acknowledged it. The capture showed both the packets arriving at the firewall and their forwarded copies leaving with the appropriate Ethernet addresses:
Logstash MAC → firewall MAC
  172.20.200.200:30200 → 172.20.200.185:54185  payload, 6 bytes
firewall MAC → guest MAC
  172.20.200.200:30200 → 172.20.200.185:54185  same payload

guest MAC → firewall MAC
  172.20.200.185:54185 → 172.20.200.200:30200  ACK
firewall MAC → Logstash MAC
  172.20.200.185:54185 → 172.20.200.200:30200  same ACK
That established an allowed application flow through OPNsense in both directions. It did not, by itself, test every deny rule or prove that all unintended guest-to-guest paths were blocked. Those are separate assertions requiring their own negative tests.
Making It Persistent
Once the packet behavior worked, the remaining job was to make it survive the SSH session and fit the router’s lifecycle. We installed a separate service named vmdata_proxyarp, using the exact tested build:
cd /root/vmdata-proxyarp-service
sh ./install.sh /root/vmdata-proxyarp-test/build.5NCZtB

service vmdata_proxyarp status
service vmdata_proxyarp check
The installer reran the 14 offline packet checks, backed up config.xml under a private directory in /conf/vmdata-proxyarp-backups/, installed the custom files, and started the service. Both the installer output and the subsequent independent status and configuration checks reported a running supervisor and responder on igb0, with the expected address, MAC, and no competing responder.
The binary lives under /usr/local/libexec/vmdata-proxyarp/, with its own rc service and enablement file. FreeBSD daemon(8) supervises the child with a five-second restart delay and separate supervisor and child PID files. A deliberate stop targets the supervisor so it does not immediately restart the child.
Before each launch, the guard checks the reviewed OPNsense/FreeBSD profile, configured and live interface details, address and mask, libraries, and competing responders. It recognizes its own child using both the owned PID and the exact executable path. It reads OPNsense configuration without editing it.
Boot, shutdown, configuration, and update hooks were installed using the OPNsense syshook mechanism. Reconciliation is designed to restart for a MAC change and stop when the interface profile is incompatible or a stock responder has returned. The custom service does not remove or kill a newly configured stock responder; restoring the old broad VIP can therefore bring the original problem back.
The service wrapper also passed 16 local policy tests and eight local transaction tests. Those exercised guard decisions, installation refusal, rollback, and ownership checks. The transaction tests mocked OS service calls; native installation and startup were subsequently confirmed on the router.
Where Things Stand Now
At the end of this session, DHCP acquisition, ordinary peer ARP, a real bidirectional TCP flow, native service installation, and the service’s status/configuration checks were verified. Reboot startup, update-hook recovery, configuration-hook execution, and a live crash/respawn exercise were still awaiting confirmation. Installing a hook is not evidence that its future event has already succeeded.
This is a locally maintained service rather than an OPNsense vendor package. It uses the physical interface MAC and was reviewed for this single-router profile, not CARP/HA. A FreeBSD major ABI change requires a rebuild and review. An XML configuration export does not include the custom binary and hooks, so the service bundle and tested build need their own recovery copy.
Suppressing the responder’s manufactured conflict also does not prove that a real duplicate guest address will be detected across an isolated fabric. That deserves a separate test. Likewise, a live process status does not prove forwarding health or detect a responder that is running but malfunctioning.
Rollback is explicit and ownership-checked:
sh /usr/local/libexec/vmdata-proxyarp/uninstall.shIt stops the managed service and removes only its recorded, unchanged files, preserving backups and unrelated files. It does not restore the broad stock Proxy ARP VIP. With the custom responder removed, DHCP remains free of this particular false conflict, but peer resolution through that responder is no longer provided.
The useful habit from this incident is to follow the complete acquisition sequence: DHCP request, server reply, address probe, and the first usable traffic. The tap’s drop message was real, but the packet that explained the failed lease was the firewall answering “that address is mine” just as the guest tried to claim it.
The new VM now has its address. Approved peer traffic still crosses OPNsense. The custom responder is installed and running.
Apparently, making the firewall pretend to be everyone requires teaching it when to let someone else introduce themselves.