Unlocking the Secrets of Samba: Active Directory
Apparently, Linux’s favorite file sharing service can also double as an Active Directory Domain Controller. I’ve taken two Linux classes and was even a Linux Administrator for many months, and I had no idea this was possible. I stumbled upon this fact because I am looking for a centralized way to manage my user accounts across my entire home lab network.
Since I am using my free AWS Windows server for this site, I had no choice but to find an LDAP server implementation on Linux since AWS gives you a free Windows and Linux server. I spent a good bit of time looking at OpenLDAP, but that will not work since Windows cannot join an OpenLDAP domain. So back to the drawing board I go. I briefly looked at pGINA, but that looks like it hasn’t been updated in almost a decade. Finally, I stumble upon……
Samba.
What? Isn’t that just a file-sharing service???

Part 1: Pre-Installation
I fire up a RHEL instance within AWS’s EC2, and I get port 389 configured from Windows <-> Linux. I then follow the pre-install instructions on Samba’s site. To set up EPEL on AWS’s RHEL, you need to run the following commands:
sudo dnf install https://dl.fedoraproject.org/pub/epel/epel-release-latest-8.noarch.rpm -y && sudo dnf config-manager --set-enabled codeready-builder-for-rhel-8-rhui-rpms && sudo yum repolistOnce everything finishes, you should see the EPEL repository in the output of yum repolist. If it is, you can install all the packages needed:
sudo yum install docbook-style-xsl gcc gdb gnutls-devel gpgme-devel jansson-devel keyutils-libs-devel krb5-workstation libacl-devel libaio-devel libarchive-devel libattr-devel libblkid-devel libtasn1 libtasn1-tools libxml2-devel libxslt lmdb-devel openldap-devel pam-devel perl perl-ExtUtils-MakeMaker perl-Parse-Yapp popt-devel python3-cryptography python3-dns python3-gpg python36-devel readline-devel rpcgen systemd-devel tar zlib-devel flex bison dbus-devel python3-markdown wget curlI have added flex, Bison, dbus-devel, and python3-markdown because Samba’s configure command requires them. We will get to this in a moment.
Now we will need to set a hostname and change our /etc/hosts file. First, to change your hostname, run:
sudo hostnamectl set-hostname yourhostnameNext, get your IP address using:
ip addr showThen add your hostname and IP address to /etc/hosts using:
sudo vi /etc/hostsPress the “i” key to enter Insert mode, then use your arrow keys to navigate to the end of the file. Press enter, and add your IP address and new hostname like so:

Finally, exit insert mode with Ctrl+C, then type Shift+; (to enter : ), press x, and hit enter. This will save your new hosts change. After making your change, log out and log back in.
Part 2: The Install
If you look on the Distribution-specific Package Installation page, it explicitly states that installing Samba from the repository does not support Active Directory. We can either jettison this RHEL install and move everything to Ubuntu or build from source. Building any software from source is always a challenge, and well, that’s why we’re both here!
First, grab the most up-to-date tar.gz installation files (the most up-to-date version as of this writing is 4.15.2). In my case, it will be:
wget https://download.samba.org/pub/samba/stable/samba-4.15.2.tar.gz && tar -zxf samba-4.15.2.tar.gz && cd samba-4.15.2 && ./configureThe following command with download the tar.gz file, extract its contents, change the directory to the newly extracted folder, and run the ./configure command. For our purpose, we can leave the default configuration options alone. Once the configure command completes, you should get the following:

Next, run the make command. This will take some time. Once make finishes, you will see:

Finally, run the sudo make install command. This will also take some time. Once the install finishes, you will see:

Next up is creating the systemd file used to start and stop the Samba Active Directory Domain Controller automatically. Enter the following:
sudo vi /etc/systemd/system/samba-ad-dc.serviceLike before, press “i” to enter insert mode, copy and paste the following:
[Unit]
Description=Samba Active Directory Domain Controller
After=network.target remote-fs.target nss-lookup.target

[Service]
Type=forking
ExecStart=/usr/local/samba/sbin/samba -D
PIDFile=/usr/local/samba/var/run/samba.pid
ExecReload=/bin/kill -HUP $MAINPID

[Install]
WantedBy=multi-user.target
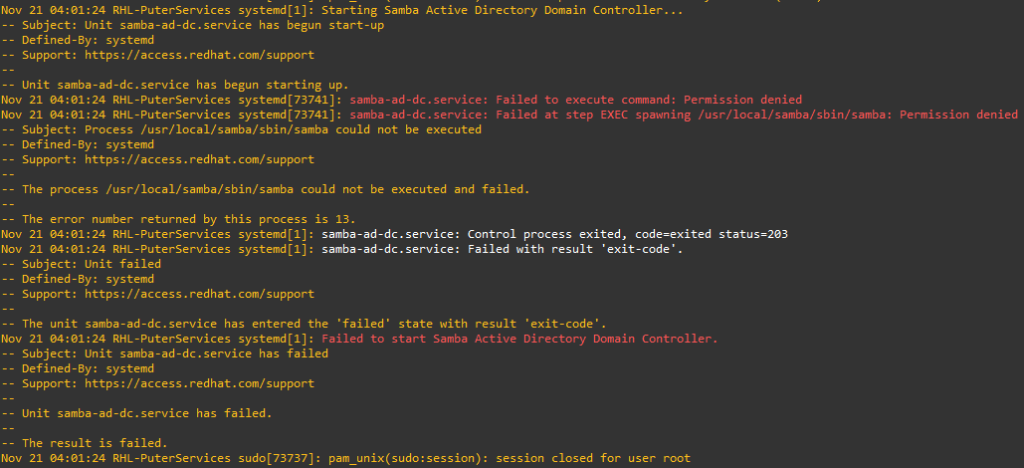
Ctrl+C, then type Shift+; (to enter : ), press x, and hit enter. If you try to start Samba now using systemctl start samba-ad-dc, it will fail with the following:

Before starting Samba, SELinux will need to be adjusted to allow Samba to run. Run the following command:
chcon -R -t bin_t /usr/local/samba/sbin/The above command will tell SELinux that Samba is permitted.
Part 3: Post-Install Configuration
Before Samba can be started, we will need to configure it. Begin by running the following commands:
sudo mv /etc/samba/smb.conf /etc/samba/smb.conf.bak ; sudo mv /etc/krb5.conf /etc/krb5.conf.bakThis will rename smb.conf and krb5.conf to a backup as we will be creating a new one soon. Run the following command:
sudo /usr/local/samba/bin/samba-tool domain provision --use-rfc2307 --interactiveThis will tell samba-tool to provision a domain using the interactive tool and allow RFC-2307. Without RFC-2307, non-Windows clients would be unable to authenticate with this server. The interactive tool will ask many questions, but you only need to provide the Realm (internal.domain.com) and the administrator password. THE ADMINISTRATOR PASSWORD MUST BE SECURE. The other settings can be left as default. Once you see the following, the tool is complete:

The last thing that is needed is the following command:
sudo mv /usr/local/samba/private/krb5.conf /etc/krb5.conf && sudo systemctl start samba-ad-dc && sudo systemctl status samba-ad-dcThis command will move the Kerberos configuration file to the correct location, request systemctl to start samba-ad-dc, and output its status. If everything was completed successfully, you should see:

Part 4: Next Steps
Now that Samba’s Active Directory Domain Controller is running, we will need to test our configuration. If the tests are successful, we will need to deploy it to the other clients. That’s Part 2!